Introduction

VirtEngine at HostingCon India 2016

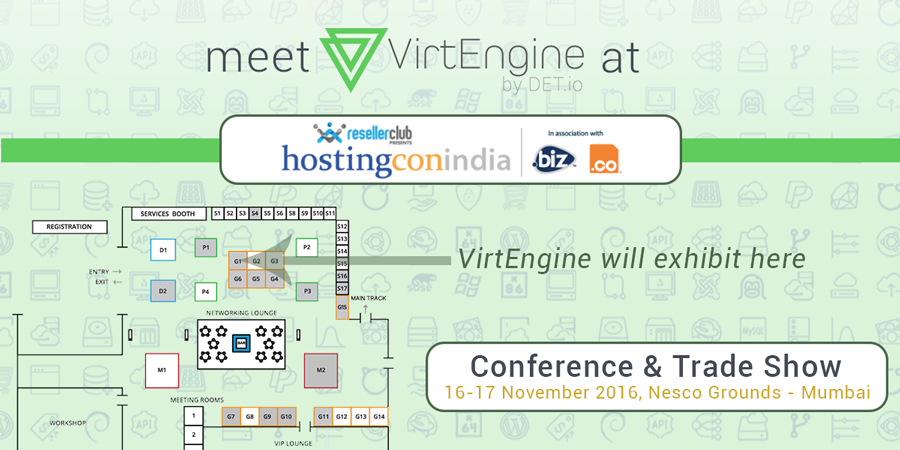
VirtEngine will be exhibiting in HostingCon India 2016! Make sure to visit our Booth @ G1 if you’re paying a visit.

About HostingCon

HostingCon is the premiere industry conference and trade show for hosting and cloud providers. In its tenth year, HostingCon India connects the industry including hosting and cloud providers, MSPs, ISVs and other Internet infrastructure providers who make the Internet work to network, learn and grow. HostingCon is an iNET Interactive event.

About VirtEngine

VirtEngine is an OpenSource Virtualization Platform, we offer Commercial Packages for Hosting & Cloud providers in order to allow them to offer hosting services to the public. Our platform enhances user experience, usability and automation!

Visit our documentation to learn more about VirtEngine’s Features: VirtEngine Documentation

Free Registration

Interested in visiting HostingCon in Mumbai? Register today for free, Register @ HostingCon India today

Introduction

Install VirtEngine Virtualization Cloud Platform

Before we begin, lets install OpenJDK8 and cassandra.

This tutorial will help you set up VirtEngine.

Prerequisites

OpenJDK8

su -c “yum install java-1.8.0-openjdk”

Cassandra 3.x

Cassandra Installation

Install VirtEngine

sudo yum update

sudo yum install verticenilavu verticegateway verticensq vertice verticevnc

Conclusion

These are the very simple steps to launch our platform in CentOS. Now you need to configuire it!

Introduction

Cassandra stores replicas on multiple nodes to ensure reliability and fault tolerance. A replication strategy determines the nodes where replicas are placed. The total number of replicas across the cluster is referred to as the replication factor.

A replication factor of 1 means that there is only one copy of each row in the cluster. A replication factor of 2 means two copies of each row, where each copy is on a different node. As a general rule, the replication factor should not exceed the number of nodes in the cluster. However, you can increase the replication factor and then add the desired number of nodes.

img

Prerequisites

To follow this tutorial :

  • You need atleast two nodes.

  • You need to install cassandra in all the nodes.

Step 1 - Create a Keyspace in cql

  • login into cqlsh

      cqlsh `ipaddress1`
    
  • Creating a keyspace

      CREATE KEYSPACE IF NOT EXISTS `keyspacename` WITH REPLICATION = { 'class' : 'NetworkTopologyStrategy', 'dc1' : 2 , 'dc2' : 2 };
    
  • Two replication strategies of class are available:

  • SimpleStrategy Use only for a single data center and one rack. If you ever intend more than one data center, use the NetworkTopologyStrategy.

  • NetworkTopologyStrategy Highly recommended for most deployments because it is much easier to expand to multiple data centers when required by future expansion.

  • Here, we are testing in multiple datacenter so we used NetworkTopologyStrategy class.

Step 2 - Configure cassandra.yaml in dc1

  • Its assumed that you have installed cassandra in the two nodes (dc1, dc2).

  • Once you installed cassandra in your machine, then you need to change the cassandra yaml file in (dc1).

  • Open the file /etc/cassandra/cassandra.yaml and change the following settings

      listen_address : `ipaddress`
      rpc_address    : `ipaddress`
      endpoint_snitch: GossipingPropertyFileSnitch
    

Note listen_address and rpc_address default is set localhost you need to change it to the private or public ipaddress (eg: 192.168.1.249).

endpoint_snitch by default is set for SimpleSnitch which works only for SimpleStrategy so you can changed the snitch to GossipingPropertyFileSnitch

  • As we have used GossipingPropertyFileSnitch we need to change the file /etc/cassandra/cassandra-rackdc.properties with the datacenter and rack information.

  • cassandra-rackdc.properties it used to tell we are using GossipingPropertyFileSnitch as endpoint.

  • Define the Data Center and Rack that this node run on. The default settings:

      dc=DC1
      rack=RAC1
    
  • Here, we are using two machines so change the file based on our setup.

      dc=DC1
      rack=RAC1
      dc=DC2
      rack=RAC1
    
  • Add the above datacenter and rack in the /etc/cassandra/cassandra-topology.properties

  • It look like this

      Data Center One
      175.56.12.105=DC1:RAC1
      175.50.13.200=DC1:RAC1
      175.54.35.197=DC1:RAC1
    
      120.53.24.101=DC1:RAC2
      120.55.16.200=DC1:RAC2
      120.57.102.103=DC1:RAC2
    
  • Change the datacenter and rack into your ipaddress in that file.

      ipaddress1=DC1:RAC1
      ipaddress2=DC2:RAC1
    
  • Use this command to check the data center name, and rack is set into your machine.

      nodetool status. ![](https://blog.virtengine.com/content/images/2016/07/cassandra.png)
    
  • Its show the status of the node.

      `UN` - define your node in up status.
      `DN` - define your node in down status.
    

Step 3- Configure cassandra.yaml in dc2

  • Its assumed that you have installed cassandra in the two nodes (dc1, dc2).

  • Once you installed cassandra in your machine, then you need to change the cassandra yaml file in (dc2 as well).

Repeat the process in as many racks/datacenters.

Conclusion

These are the very simple steps to setup cassandra replications in several nodes.

To Deploy your app

img

Introduction

One of the questions we have been asked is what is the secret sauce in our enterprise edition as all our stuff is opensource.

Hence this is one of our secret sauce. Yes if you want to run secure docker containers by using a hypervisor like KVM, contact us @info@megam.io. If you are from the hosting industry we will put you in touch with our partner DET.io (jonathan@det.io).

In this article we will provide the opensource way of doing stuff on your own.

Lets get started too launch the docker container in secure isolated with a very fast launch using hypercontainers.

Introducing HyperContainer

HyperContainer is a Hypervisor-agnostic Docker Runtime that allows you to run Docker images on any hypervisor (KVM, Xen, etc.).

 HyperContainer = Hypervisor + Kernel + Docker Image

By containing applications within separate VM instances and kernel spaces, HyperContainer is able to offer an excellent Hardware-enforced Isolation, which is much needed in multi-tenant environments.

HyperContainer also promises Immutable Infrastructure by eliminating the middle layer of Guest OS, along with the hassle to configure and manage them.

Setup HyperContainer

This initial section contains everything you need to setup the hypercontainer on one of your baremental server.

Now if your have a several servers, you can contact us, the enterprise edition is a lifesaver.

Step - 1 Install HyperContainer

The Prerequisites are,

Hypervisor: at least one of

[Linux] QEMU KVM 2.0 or later [Linux] Xen 4.5 or later (for Xen support)

We will use KVM here. Supose your server doesn’t have the any hypervisor you need to install the following

  sudo apt-get install qemu-system

Now the install hypercontainer on your server,

 wget https://hyper-install.s3.amazonaws.com/hyper-latest.tgz
 tar -xvzf hyper-latest.tgz

Then cd into the hyper-pkg directory

./bootstrap.sh
./install.sh

Next we start the hyperd service

sudo service hyperd start
Step - 2 Pull Docker Images

To pull the docker images from docker registry by using these command

hyper pull tutum/hello-world

Now the container pulled in sub-millseconds.

To list the docker images

hyper images

REPOSITORY            TAG   IMAGE ID     CREATED        VIRTUAL SIZE
tutum/hello-world   latest  4b95f40f2f4d   2015-12-14 16:16:44   17.0 MB
Step -3 Network setup

By default the hypercontainer uses hyper0 bridge but we wil have to use our own subnet (own bridge)

Lets setup a bridge named one in your server.

brctl addbr one

Once you have created a bridge you need to change the configuration file under in /etc/hyper/config

Kernel=/var/lib/hyper/kernel
Initrd=/var/lib/hyper/hyper-initrd.img
Bios=/var/lib/hyper/bios-qboot.bin
Cbfs=/var/lib/hyper/cbfs-qboot.rom
Bridge=one
BridgeIP=xxx.xxx.x.x/24

Then restart the hyperd service

service hyperd restart
Step - 4 Run the HyperContainer
hyper run --name test -d tutum/hello-world

The hypercontainer runs in an isolated space in an independent kernal.

To list the running hypercontainers

hyper list
POD ID            POD Name           VM name                 Status
pod-IlLsHBTYGQ      tutum1       vm-FXBRjvEgJY              running

Conclusion

These are the very simple steps to successfully launch a docker container in a secure isolated space.

Again if you have a lot os server rack, we have the solution. Contact us @ hello@virtengine.com
Introduction

You want to backup your data in cloud and access it on need. Cloudberry backup desktop client can be used to backups files and folders on your Windows machine to our cloud storage - Atharva VirtEngine.

Introducing Atharva Storage - VirtEngine

Atharva Storage - VirtEngine is a “Cloud object storage, low latency and (S3 - AWS Signature v2) compatible API built on top of ceph - jewel.”.

Upon successful signin to https://console.VirtEngine.com, look for the icon at the top right hand corner named Storage

This tutorial will guide you in setting up a Cloudberry backup tool for windows client on your windows 7+/10 workstation and connecting it to manage your atharva storage account in VirtEngine.

Prerequisites

Connecting Cloudberry Backup Desktop client with Atharva (Ceph object storage) VirtEngine

This initial section contains everything you need to setup cloudberry backup tool for windows native client on your server.

Step-1 Download Cloudberry Backup Desktop client for windows
  • Go to this link. Cloudberry backup.

  • Click Download button to start your download.

  • Right-click the download file and install it in your windows system.

Step-2 Create the storage setting with VirtEngine
  • Once you successfully install CloudBerry, start up the application to display theWelcome screen.

  • click theSetup Backup Plan button in the middle of the page

  • CloudBerry has many options for backup targets. In this tutorial we’re focusing on Amazon’s s3 compatible cloud storage offerings.

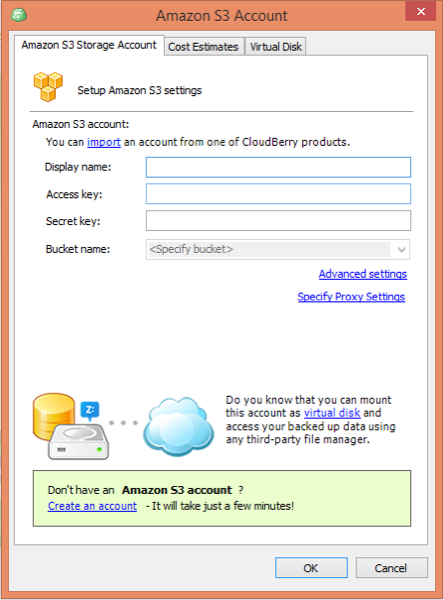
  • On the S3 Compatible Storage tab specify Servie point as 88.198.139.81.

  • Enter the other details.

    Display Name : Type a name for the account
      Access key
      Secret key
    
  • You can see your Access-key and Secret-key from your profile page in MegamAfrica. (https://console.megamafrica.com)

  • Click the “Advance Settings” and uncheck Use SSL link. Now you can see your bucket in Bucket name box. choose one of the bucket you want to backup.

  • Next you’ll want to select your backup mode as Simple.

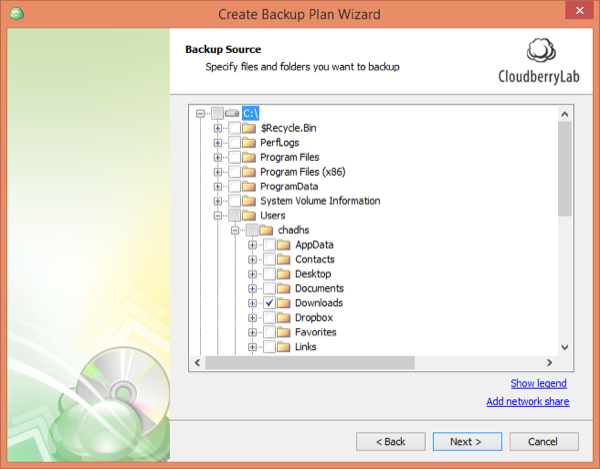
  • On the next page you’ll want to select your Backup Source. Select your folder to connect with MegamAfrica storage

  • Once you see that your Backup Plan is successfully created, press “Finish” leaving the “Run backup now” box checked, to test your newly configured backup.

  • From the Welcome screen you’ll be able to see that your backup is currently running, and some live summary information about the backup job.

Upload a file from cloudberry backup tool to VirtEngine
  • Copy the one or multiple files to upload/copy an upload folder if you want to upload a whole folder.

  • Paste into Backup source folder. The upload process will begin.

  • Let us verify if the files is uploaded

Logon https://console.VirtEngine.com goto storage place. You can see your bucket, and the uploaded files are displayed.

Conclusion

These are the very simple steps to create a sync tool for an upload files using Windows native client using cloudberry backup to Atharva - VirtEngine.

This is a good head-start for using Cloudberry & our Athava ceph based object storage in VirtEngine.

Start uploading to our storage - VirtEngine