Cassandra Replication - HA
Introduction
Cassandra stores replicas on multiple nodes to ensure reliability and fault tolerance. A replication strategy determines the nodes where replicas are placed. The total number of replicas across the cluster is referred to as the replication factor.
A replication factor of 1 means that there is only one copy of each row in the cluster. A replication factor of 2 means two copies of each row, where each copy is on a different node. As a general rule, the replication factor should not exceed the number of nodes in the cluster. However, you can increase the replication factor and then add the desired number of nodes.
Prerequisites
To follow this tutorial :
-
You need atleast two nodes.
-
You need to install cassandra in all the nodes.
Step 1 - Create a Keyspace in cql
-
login into cqlsh
cqlsh `ipaddress1` -
Creating a keyspace
CREATE KEYSPACE IF NOT EXISTS `keyspacename` WITH REPLICATION = { 'class' : 'NetworkTopologyStrategy', 'dc1' : 2 , 'dc2' : 2 }; -
Two replication strategies of class are available:
-
SimpleStrategyUse only for a single data center and one rack. If you ever intend more than one data center, use the NetworkTopologyStrategy. -
NetworkTopologyStrategyHighly recommended for most deployments because it is much easier to expand to multiple data centers when required by future expansion. -
Here, we are testing in multiple datacenter so we used NetworkTopologyStrategy class.
Step 2 - Configure cassandra.yaml in dc1
-
Its assumed that you have installed cassandra in the two nodes (dc1, dc2).
-
Once you installed cassandra in your machine, then you need to change the cassandra yaml file in (dc1).
-
Open the file
/etc/cassandra/cassandra.yamland change the following settingslisten_address : `ipaddress` rpc_address : `ipaddress` endpoint_snitch: GossipingPropertyFileSnitch
Note listen_address and rpc_address default is set localhost you need to change it to the private or public ipaddress (eg: 192.168.1.249).
endpoint_snitch by default is set for SimpleSnitch which works only for SimpleStrategy so you can changed the snitch to GossipingPropertyFileSnitch
-
As we have used
GossipingPropertyFileSnitchwe need to change the file/etc/cassandra/cassandra-rackdc.propertieswith the datacenter and rack information. -
cassandra-rackdc.propertiesit used to tell we are using GossipingPropertyFileSnitch as endpoint. -
Define the Data Center and Rack that this node run on. The default settings:
dc=DC1 rack=RAC1 -
Here, we are using two machines so change the file based on our setup.
dc=DC1 rack=RAC1 dc=DC2 rack=RAC1 -
Add the above datacenter and rack in the
/etc/cassandra/cassandra-topology.properties -
It look like this
Data Center One 175.56.12.105=DC1:RAC1 175.50.13.200=DC1:RAC1 175.54.35.197=DC1:RAC1 120.53.24.101=DC1:RAC2 120.55.16.200=DC1:RAC2 120.57.102.103=DC1:RAC2 -
Change the datacenter and rack into your ipaddress in that file.
ipaddress1=DC1:RAC1 ipaddress2=DC2:RAC1 -
Use this command to check the data center name, and rack is set into your machine.
nodetool status. 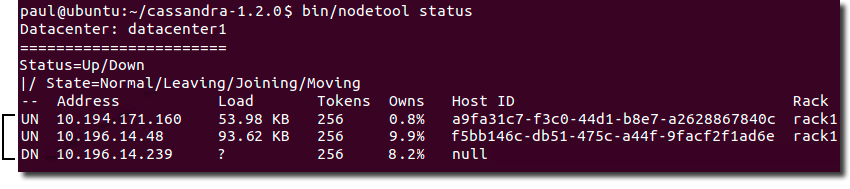 -
Its show the status of the node.
  `UN` - define your node in up status.
  `DN` - define your node in down status.
Step 3- Configure cassandra.yaml in dc2
-
Its assumed that you have installed cassandra in the two nodes (dc1, dc2).
-
Once you installed cassandra in your machine, then you need to change the cassandra yaml file in (dc2 as well).
Repeat the process in as many racks/datacenters.
Conclusion
These are the very simple steps to setup cassandra replications in several nodes.