Riak is a distributed NoSQL key-value data store that offers extremely high availability, fault tolerance, operational simplicity and scalability.[2] In addition to the open-source version, it comes in a supported enterprise version and a cloud storage version that is ideal for cloud computing environments.

Written in Erlang, Riak has fault tolerance data replication and automatic data distribution across the cluster for performance and resilience

Riak has a pluggable backend for its core storage, with the default storage backend being Bitcask.[7] LevelDB is also supported.

System Setup

	OS : Ubuntu 14.04.2 LTS
    Riak : Riak 2.1.1   Riak cluster needs atleast two servers. My servers are

riak1's ip address is 192.168.1.11
riak2's ip address is 192.168.1.12

Do the installation(install riak step) in all the servers

Install Riak :

Riak installation in pretty easy. Just wget the debian package from site and dpkg it.

$ wget https://s3.amazonaws.com/downloads.basho.com/riak/2.1/2.1.1/ubuntu/trusty/riak_2.1.1-1_amd64.deb
$ sudo dpkg -i riak_2.1.1-1_amd64.deb

After installing riak, we need to start it manually. Before starting riak, let’s change the riak configuration.

riak’s configuraton file is at /etc/riak/riak.conf

change the nodename of riak first, default

	nodename = riak@LOCALHOST_IP

Change it as

nodename = riak@SYSTEM_IP_ADDRESS

Command to do this change

	$ sudo sed -i 's/^[ \t]*nodename = riak.*/nodename = riak@SYSTEM_IP_ADDRESS/' /etc/riak/riak.conf

Where $SYSTEM_IP_ADDRESS is YOUR_LOCAL_SYSTEM_IP

In the same way change the http.listner and protobuf.listner ip

$ sudo sed -i ‘s/^[ \t]listener.http.internal =./listener.http.internal = SYSTEM_IP_ADDRESS:8098/’ /etc/riak/riak.conf $ sudo sed -i ‘s/^[ \t]listener.protobuf.internal =./listener.protobuf.internal = SYSTEM_IP_ADDRESS:8087/’ /etc/riak/riak.conf

Start riak in all the servers

$ sudo riak start

Now you have running riak in all the servers. In my case,

riak@RIAK1_IP_ADDRESS
riak@RIAK2_IP_ADDRESS Both are running without any problem
Make Cluster

Now it is time to make cluster

From riak@RIAK1_IP_ADDRESS server, run this commands

$ sudo riak-admin cluster join riak@RIAK2_IP_ADDRESS
$ sudo riak-admin cluster plan
$ sudo riak-admin cluster commit

That’s it. Servers are clustered. You can check cluster status

$ sudo riak-admin cluster status

The result should be like

  ---- Cluster Status ----
Ring ready: true

+------------------------+------+-------+-----+-------+
|          node          |status| avail |ring |pending|
+------------------------+------+-------+-----+-------+
|     riak@RIAK1_IP_ADDRESS |valid |  up   | 50.0|  --   |
| (C) riak@RIAK2_IP_ADDRESS |valid |  up   | 50.0|  --   |
+------------------------+------+-------+-----+-------+

Key: (C) = Claimant; availability marked with '!' is unexpected

RabbitMQ is an open source message broker software (sometimes called message-oriented middleware) that implements the Advanced Message Queuing Protocol (AMQP). The RabbitMQ server is written in the Erlang programming language and is built on the Open Telecom Platform framework for clustering and failover.

RabbitMQ clustering simply involves configuring multiple slaves to connect to a master. When RabbitMQ is installed it works as an independent server (and that’s just fine, but clustering is recommended for production systems that want High Availability). You need to designate one server as a master, configure it, and then configure slaves to connect to this master. You can read a more thorough clustering guide on their site : https://www.rabbitmq.com/clustering.html. In this post I’ve condensed it down to the essentials.

My cluster setup

Each server is having ubuntu-14.04

Each server's hostname should be unique
Each server's erlang cookie should be unique

rabbitmq-master 192.168.1.11 rabbitmq-slave 192.168.1.12

Master setup
IPADDRESS is 192.168.1.11
Hostname is rabbitmq-master
  1. install rabbitmq-server package

     $ sudo apt-get install rabbitmq-server
    
  2. Edit /etc/hosts and add the entry for slave server

     192.168.1.12 rabbitmq-slave 3. RabbitMQ is built on Erlang. Erlang systems which need to talk to each other must have the same magic cookie. This is a basic security mechanism to prevent unauthorized access to an Erlang system. An Erlang cookie is simply a hash stashed away in a file. Copy the file content of
    
     /var/lib/rabbitmq/.erlang.cookie
    
Slave setup
IPADDRESS is 192.168.1.12
Hostname is rabbitmq-slave
  1. install rabbitmq-server package

     $ sudo apt-get install rabbitmq-server
    
  2. Edit /etc/hosts and add the entry for slave server

     192.168.1.11 rabbitmq-master
    
  3. stop rabbitmq service

     $ sudo service rabbitmq-server stop
    
  4. Edit the file content of /var/lib/rabbitmq/.erlang.cookie

     Paste the content you copied from master server
    
  5. Create a file $ nano /etc/rabbitmq/rabbitmq.config

     %%%
     %% Generated by Chef
     %%%
     [
     {kernel, [
     	    ]},
       	{rabbit, [
     {cluster_nodes, ['rabbit@rabbitmq-master','rabbit@rabbitmq-slave']},
     {tcp_listen_options, [binary, {packet,raw},
                               {reuseaddr,true},
                               {backlog,128},
                               {nodelay,true},
      	{exit_on_close,false},
                               {keepalive,false}]},
     	{default_user, <<"guest">>},
     {default_pass, <<"guest">>}
     ]}
     ].
    
  6. Start rabbitmq

     $ sudo service rabbitmq-server start
    
  7. Start the cluster

     $ sudo rabbitmqctl stop_app
     $ sudo rabbitmqctl reset
     $ sudo rabbitmqctl start_app
    

Taht’s it. Now you can check your cluster status

$ sudo rabbitmqctl cluster_status
	Cluster status of node 'rabbit@rabbitmq-slave' ...
	[{nodes,[{disc,['rabbit@rabbitmq-master', 'rabbit@rabbitmq-slave']}]},
    {running_nodes,['rabbit@rabbitmq-master', 'rabbit@rabbitmq-slave']},
	{partitions,[]}]
	...done.

This summer @megamsys we started implementing micro services (containers) in baremetal for our customer and our public service in beta

The market largely is about 4 kinds + emerging unikernel owing to some of the issues posed on security by the famous docker

The container market is consolidating with Big brother docker taking the lead in coming up opencontainers.org. But we believe docker has the undue advantage as their standard will be superimposed as noted in the CoreOS.

The emerging one are the Unikernel or library kernel which run just one app on top of a hypervisor. This is secure and is still nascent. we would eventually like to suppor the above.

Containers in a VM cluster or CoreOS like

</td>
Who Link Where
Google container engine GoogleVM
Elasticbox Elasticbox VM
Panamax by centurylink Panamax CoreOS
Apcera by Ericsson Apcera Kurma
Engineyard (DEIS) Deis CoreOS
Profitbricks Profitbricks Bare metal *maybe
Krane Krane VM
Joyent Triton Triton Don't know
Shipyard Shipyard Onpremise bare metal
Docker machine Docker VM
Openshift Atomic VM
Rancher Rancher Onpremise bare metal
Cloudfoundry Garden Don't know
IBM Bluemix Bluemix Don't know
Openstack Openstack - Docker Don't know *confusing
Cloudify Cloudify Don't know
Photon VMWare Photon CoreOS like - propretitory
runC (new kid) Opencontainers Opencontainer - baremetal

The funny thing in the above take is how everybody royally screws Openstack in getting into containers when it doesn’t need to.

Anyway last year we had docker running inside a virtual machine. In our hackathon we demonstrated running containers inside managed VMs.

But containers are best utilized on baremetal.

We needed a way to run it inside bare metal.

Stay with me, Yes we are warming up with the problem now

We need a reliable way to run containers in a datacenter with various clustered hosts

What do you mean ?

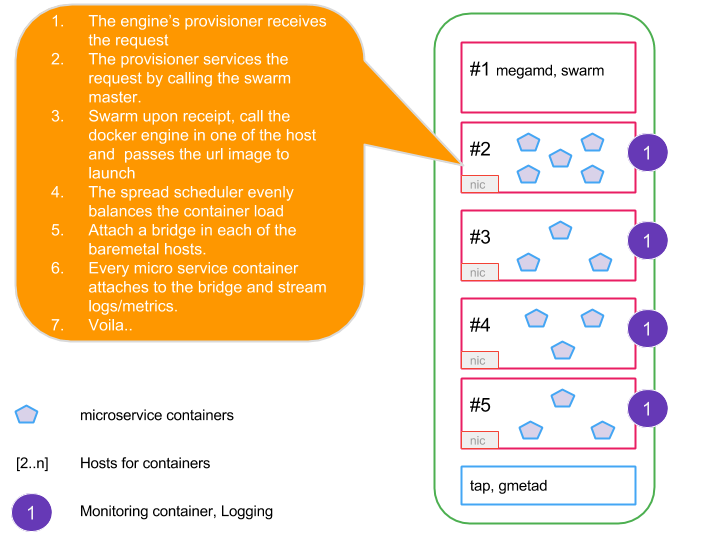
A picture is worth a 1000 words.

Megam docker

To do that we need schedulers that can orchestarte and compose containers. We use the term micro service and containers in an interchangeable way, they both mean the same.

Containers orchestrated by schedulers

Lets look at the orchestration for on premise baremetal cloud.

In a unanimous way most companies choose

Who Link Orchestrator
Openshift Origin Kubernetes
Techtonic Techtonic - CoreOS Kubernetes
Cloudify Cloudify Don't know
Docker Docker compose Fig (Docker compose)
Rancher Rancher Don't know
Panamax by centurylink Panamax Kubernetes
Cloudfoundry Garden Don't know

Most vendor use the containter orchestration using Docker compose [fig] or Kubernetes.

Well at Megam as seen from the picture we have own omni scheduler built using golang

Who Link Orchestrator
Megam megamd Megam

Diving into the problem

We need a reliable way to run containers in a datacenter with various clustered hosts

Docker swarm

We started looking at docker swarm, it sounded so sweat that you can have run swarm and just join new docker engine into our “dockercluster” on the go as your datacenter nodes expand.

###No we were plain WRONG.

Why ? Since if you visit our architecture, we had docker engines running in bunch of servers, and a swarm cluster being formed. The swarm master will talk to all the docker engines and provision containers on bare metal in a load balanced way in all the hosts.

Eg:

  • As a developer0 lets say i submitted the first container from [our public beta developer edition - console.megam.io](https://console.megam.io] - Oh yeah you have an onpremise edition from a marketplace
  • Similarly developer1 - developer2 submit concurrently to the swarm cluster
  • swarm needs to spread and schedule/load balance the containers on all the hosts equally.

Whereas the current swarm is broken by having a mutex lock to a variable that just waits until the first container that you submitted is complete.

In the essence it becomes like a serial operation to submit containers.

We poked the code high, and found this in the code as fixed here megamsys/swarm. This may be left intentionally as docker intends to support Apache mesos

// CreateContainer aka schedule a brand new container  into the cluster.
func (c *Cluster) CreateContainer(config *cluster.ContainerConfig, name string) (*cluster.Container, error) {
    //*MEGAM* https://www.megam.io remove the mutex scheduler lock
    //c.scheduler.Lock()
    //defer c.scheduler.Unlock()

{<2>}Code fix

Once we fixed the above code and packaged swarm, it worked like a charm.

We believe Docker doesn’t want to open up its default scheduler but force people to use Mesos. We at Megam are allegic to Java (JVM) as it bloats too much memory and we use judicially.

Setup and give it a try.

In Part1 we looked at how does the general RESTful API design for the input request look like.

We will use functional programming design technique - scalaz library and apply it to the design we have so far.

Scalaz

scalaz is an extension of the core library for functional programming.

Why functional ?

We can defer the computation until we need to actually do it.

Break programs in to partitioned computations

Just play with plain old data structures instead of fancy polymorphism types like AbstractBufferedToddlerReadyPlaySchool.

We will not cover scalaz here, however you can refer a tutorial to learn scalaz.

Some of the libraries that we will use are

  • scalaz.Validation
  • scalaz.effect.IO
  • scalaz.EitherT._
  • scalaz.NonEmptyList._

More precisely the following will be imported.

import scalaz._
import scalaz.Validation._
import Scalaz._
import scalaz.effect.IO
import scalaz.EitherT._
import scalaz.Validation
import scalaz.NonEmptyList._
import scalaz.Validation.FlatMap._

The first concept we will study is about, map. This isn’t a theory on monads, but talks about how we used it. so bear with me.

map

//A functor with one fuction.

def map[B](f: A => B) : M[B]

For example you can convert a List of Ints to String. Why would you want to do that ? Lets just say we feel cool :).

List[Int] -> List[String]

Lets change a list of Ints to Option[Int]

val listT = List(1,2,3)

listT.map(x => Some(x)) -> List[Option[Int]]

The next one we will use a lot is, flatMap.

flatMap

def flatMap[B](f: A => M[B]) : M[B]

Lets change a list of Ints to Option[Int]

val fruits = Seq("apple", "banana", "orange")

val ufruits = fruits.map(_.toUpperCase)

//lets first map the fruits to make them uppper case
:Seq[java.lang.String] = List(APPLE, BANANA, ORANGE)

ufruits.flatMap(_.toUpperCase)

//lets do a flatMap on the uppercased list
:Seq[Char] = List(A, P, P, L, E, B, A, N, A, N, A, O, R, A, N, G, E)

Validation

Many a times you will find try catch to be cumbersome in trapping errors. It becomes ugly where you start throwing down exceptions just to propogate and handle it.

Some times you need a value of the exception to proceed further or just halt there.

A better way would be to handle exceptions as a value. Here you can see that an CannotAuthenticateError is returned as below.

Validation.failure[Throwable, Option[String]](CannotAuthenticateError("""Invalid content in header. API server couldn't parse it""", "Request can't be funneled."))

Validation.success[Throwable, Option[String](Some("Hurray I am done"))

There are two type parameters in the above Throwable and Option[String]

We will use the term

Left to indicate the failure (Throwable) and

Right to indicate the success (Option[String])

During a failure, the Left is provided with the value of the failure.

During a success, the Right is provided with the success value.

ValidatioNel

ValidationNel is a convinient method to wrap a NonEmptyList to the list of results. It can be useful where you want to concatenate the results of chained computation.

For instance - hit the guys head with a nail 10 times and tell the results of it what happened each time.

Did the guy duck or get it ?

ValidationNel[Throwable, Option[Hit]]

There are convenient methods to change Validation to ValidationNel.

Where can you use ?

When you call your model to create something, you want to return all the results to the callee.

In the below code, we create an account and return the Left or Right to the callee.

Model results

The first step is that we send a json string to the model to store.

But first we need to validate it to a known schema AccountInput and see if it satisfies the same. If not we return an error MalformedBodyError

We wrap the schema extraction on Validation.fromTryCatch which results in Left or Right automatically.

So if we wanted to proceed with upon success of the schema validation we need to use a flatMap

So if we wanted to proceed with upon failure of the schema validation we need to use a leftMap

def create(input: String): ValidationNel[Throwable, Option[AccountResult]] = {
play.api.Logger.debug(("%-20s -->[%s]").format("models.Accounts", "create:Entry"))
play.api.Logger.debug(("%-20s -->[%s]").format("input json", input))
(Validation.fromTryCatch[models.AccountInput] {
  parse(input).extract[AccountInput]
} leftMap { t: Throwable => new MalformedBodyError(input, t.getMessage)
}).toValidationNel.flatMap

Ignore the toValidationNel for now. We will get to it in a minute.

So you saw how easy its to trap failure/success in a simple scenario.

By using for comprehension imagine the power to chain computation which decides if it wants to proceed or exit out and inform the callee.

Sweet.

for {
  m <- accountInput // verify the schema
  bal <- //create an empty billing record
  uid <- //get an unique id to store in riak
} yield {
       //yield a success result
}

So you just understood how to chain computations to arrive at a result, as opposed to the imperative style of a humongous loads of classes.

We are going to proceed further and explore calling our model a bunch of times and keep storing success or failure.

toValidationNel is a helper method that lets you convert a Validation to ValidationNel

ValidationNel comes handy.

ValidationNel put to use

Let us take a scenario where in our case when an user clicks the button Marketplaces we want to talk to the gateway - REST API server

to display the Marketplaces screen
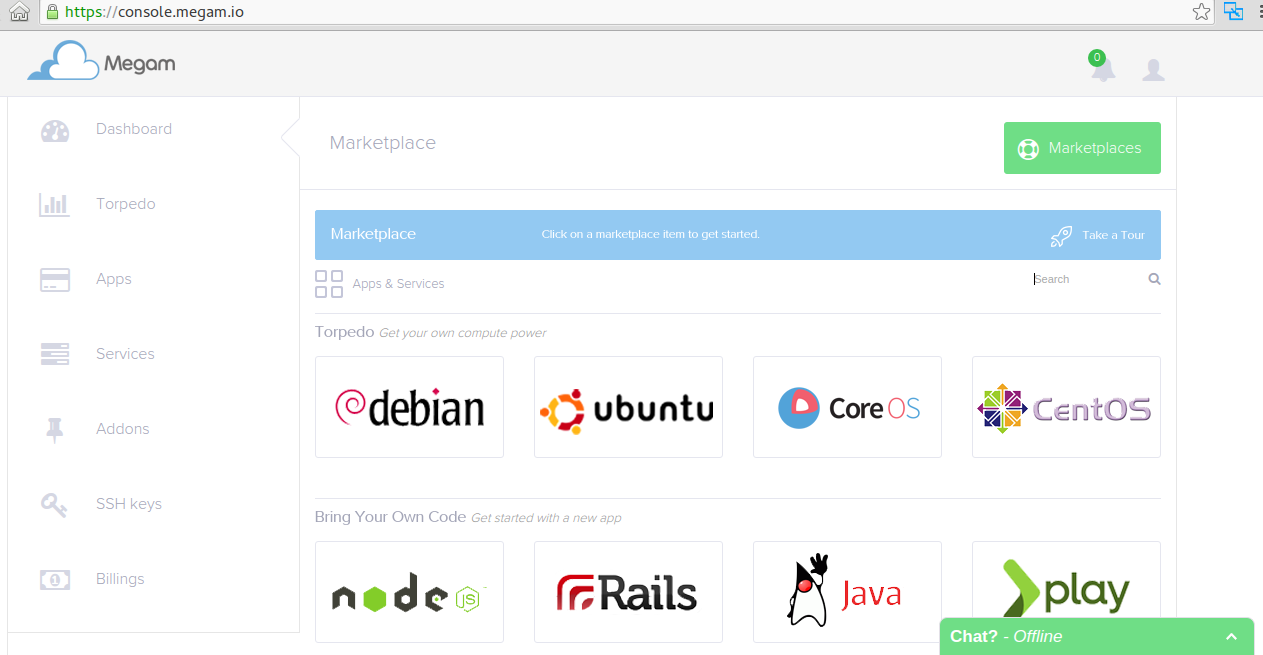
Yeah. Here is the code.

def findByName(marketPlacesNameList: Option[Stream[String]]): ValidationNel[Throwable, MarketPlaceResults] = {
(marketPlacesNameList map {
  _.map { marketplacesName =>
    InMemory[ValidationNel[Throwable, MarketPlaceResults]]({
      cname: String =>  {
          (riak.fetch(marketplacesName) leftMap { t: NonEmptyList[Throwable] =>
            new ServiceUnavailableError(marketplacesName, (t.list.map(m => m.getMessage)).mkString("\n"))
          }).toValidationNel.flatMap { xso: Option[GunnySack] =>
            xso match {
              case Some(xs) => {                    (Validation.fromTryCatchThrowable[models.MarketPlaceResult,Throwable] {                      parse(xs.value).extract[MarketPlaceResult]
                } leftMap { t: Throwable =>
                  new ResourceItemNotFound(marketplacesName, t.getMessage)
                }).toValidationNel.flatMap { j: MarketPlaceResult =>
                  Validation.success[Throwable, MarketPlaceResults](nels(j.some)).toValidationNel //screwy kishore, every element in a list ?
                }
              }
              case None => Validation.failure[Throwable, MarketPlaceResults](new ResourceItemNotFound(marketplacesName, "")).toValidationNel
            }
          }
        }
    }).get(marketplacesName).eval(InMemoryCache[ValidationNel[Throwable, MarketPlaceResults]]())
  }
} map {
  _.foldRight((MarketPlaceResults.empty).successNel[Throwable])(_ +++ _)
}).head //return the folded element in the head.

}

Lets examine the code. What we are saying here is

I hand you a list of Option[marketplace names], call the db and get me a ValidationNel[Failure/Success result] for each of the list item

  • The first step is to map on the marketplaceName and start unwrapping what is inside it.
  • As the type is Option[Stream] we see a double map
  • There is a State monad cache InMemory used here which basically caches read only information inmemory or memcache as configured. The design details of State Monad will be explained in another article.
  • For every element marketplacesName see if it came out successful (leftMap), if not set ResourceItemNotFound for this result
  • If the result is successsful, then validate its schema that was stored before and keep accumulating the result

Note: Here you see that the computation results are to be store in a list of ValidationNel’s List[ValidationNel]

  • At the end hence we use fold using a Successful accumulator to get the head which contains the results.

Super cool. eh!…

###Usage of flatMap

When you receive the result as Validation, the subsequent computation needs to handle (Left) or (Right).

To do so, we use our friend flatMap

In the below code, we marshall a json to a Scala object called models.AccountInput

(Validation.fromTryCatch[models.AccountInput] {
  parse(input).extract[AccountInput]
} leftMap { t: Throwable => new MalformedBodyError(input, t.getMessage)
}).toValidationNel.flatMap { m: AccountInput =>

The result of the marshalling can result in an exception or models.AccountInput object

If the results are successful then the flatMap will provide the AccountInput object as seen above.

###either[T, S] \/

Wait isn’t either \/ disjunction appear like Validation.

Note either \/ is isomorphic to Validation.

What the heck is isomorphism. ?

Isomorphism is a very general concept that derives from the Greek iso, meaning “equal,” and morphosis, meaning “to form” or “to shape.”

Lets take this example and illustrate how either[T,S] differs from Validation.

For instance - hit the guys head with a nail 10 times and tell the singular result of failure or success by aggregating everything.

  • 1st hit [Sucess]
  • 2nd hit [Failure]
  • 3rd hit [Success]

Did the guy duck or get it considering even on hit is a failure ? Yes the answer to the above is [Failure]

Lets study by taking an example.

(for {
  resp <- eitherT[IO, NonEmptyList[Throwable], Option[AccountResult]] { //disjunction Throwabel \/ Option with a Function IO.
    (Accounts.findByEmail(freq.maybeEmail.get).disjunction).pure[IO]
  }
  found <- eitherT[IO, NonEmptyList[Throwable], Option[String]] {
    val fres = resp.get
    val calculatedHMAC = GoofyCrypto.calculateHMAC(fres.api_key, freq.mkSign)
    if (calculatedHMAC === freq.clientAPIHmac.get) {
      (("""Authorization successful for 'email:' HMAC matches:
        |%-10s -> %s
        |%-10s -> %s
        |%-10s -> %s""".format("email", fres.email, "api_key", fres.api_key, "authority", fres.authority).stripMargin)
        .some).right[NonEmptyList[Throwable]].pure[IO]
    } else {
      (nels((CannotAuthenticateError("""Authorization failure for 'email:' HMAC doesn't match: '%s'."""
        .format(fres.email).stripMargin, "", UNAUTHORIZED))): NonEmptyList[Throwable]).left[Option[String]].pure[IO]
    }
  }
} yield found).run.map(_.validation).unsafePerformIO()   }

In the above there are two computations resp, found that are wrapped in eitherT[IO, NonEmptyList[Throwable], Option[T]]

The first computation returns the results of Account.findByEmail and wraps it in pure[IO]

The second computation takes the success of the find and see if account is valid and can be authenticated.

At the end of the computation you will notice that we yield the found where we convert it to a Validation and tell scala to run the unsafe mode now.

I suppose we have given you an overall perspective of just 3 things in the scalaz world.

  • map, flatMap
  • Validation, ValidationNel
  • eitherT

We had applied the same in how this was used in our awesome api server https://github.com/megamsys.

If you guys want to learn more then press a few likes here functional conf

In this we will get started with the cool language from mozilla - Rust.

We will use functional programming as far as we can. Rust supports it in an elegant way.

Rust

rust is a systems programming language that is compiled and hence there is not garbage collection unlike Go. Hence its a super cool/fast language. It has an awesome rubygems like community in crates.io.

The symantics are little bit different but you’ll get used to it.

Why are we looking at rust ?

We started out to identitfy memory optimized language for our IoT startegy. So we decided to put it action in our commandline rewrite meg

Installing rust

  • Ubuntu

    sudo add-apt-repository ppa:hansjorg/rust

sudo apt-get install rust-stable cargo-nightly
  • Arch linux

    yaourt rust cargo-bin

Your first rust lang library

A rust lang library is something that can be included as a crate in a program we build.

In this case we will pull our cli library called rust-turbo

rust-turbo.

Let us clone this library locally to ~/megam.

git clone https://github.com/megamsys/rust-turbo

cargo clean

cargo build

[ram@ramwork:rust-turbo|master]$ cargo build
   	Compiling gcc v0.3.5
   	Compiling hamcrest v0.1.0 		(https://github.com/carllerche/hamcrest-rust.git#b61fef3e)
Compiling libc v0.1.8
Compiling glob v0.2.10
Compiling strsim v0.3.0
Compiling rustc-serialize v0.3.14
Compiling regex v0.1.30
Compiling term v0.2.7
Compiling log v0.3.1
Compiling time v0.1.25
Compiling env_logger v0.3.1
Compiling docopt v0.6.64
Compiling rust-turbo v0.2.0   (file:///home/ram/code/megam/rust/rust-turbo)

Cool we just built our first library.

Every project that uses cargo as the build tool will include a file called Cargo.toml

  • library ? Huh !

The question is how do you decide if you are building a binary (executable) or a library to be includeded as a crate.

Make a change in the cargo.toml file include the following.

[lib]
name = "turbo"
path = "src/turbo/lib.rs"

testing

cargo tests

There are bunch of tests under src/tests that are under the src directory they get run automatically.

Use a matcher like hamcrest to compare the output and expected out to decide on the failure or success of your tests.

namespaces

In our case cargo will look forward towards a file called turbo/lib.rs. The details of lib.rs are

#![deny(unused)]
#![cfg_attr(test, deny(warnings))]

#[macro_use] extern crate log;

#[cfg(test)] extern crate hamcrest;
extern crate docopt;
extern crate glob;
extern crate rustc_serialize;
extern crate term;
extern crate time;
extern crate libc;

pub mod util;
pub mod core;
pub mod turbo;

Let us examine the above.

  • extern crate indicates our intention to use an external library eg: logging, docopt (options command line parsing) etc.

  • pub mod util indicates that we intend to include a module named util.rs or util/mod.rs.

If you see our source code we have 3 folders util, core, and turbo.rs

You first rust executable

In this case we will pull our cli exec we are building called meg

meg.

Let us clone this library locally to ~/megam.

git clone https://github.com/megamsys/meg

cargo clean

cargo build

The built binary will be under targets. so run it to your hearts content. eg:

meg version

We have covered setting up rust, and get going with a rust library and an executable. Stay tuned on other design specifics using rusty lang.. Adios.