Use Windows client S3 Browser to connect with VirtEngine Storage (ceph)
Introduction
S3 Browser is a freeware Windows client for Amazon S3. Amazon S3 provides a simple web services interface that can be used to store and retrieve any amount of data, at any time, from anywhere on the web.
Introducing Atharva Storage - VirtEngine
Atharva Storage - VirtEngine is a “Cloud object storage, low latency and (S3 - AWS Signature v2) compatible API built on top of ceph - jewel.”.
 Upon successful signin to https://console.VirtEngine.com, look for the icon
at the top right hand corner named
Upon successful signin to https://console.VirtEngine.com, look for the icon
at the top right hand corner named Storage

This tutorial will guide you in setting up a S3 Browser windows client on your windows 7+/10 workstation and connecting it to manage your atharva storage account in VirtEngine.
Prerequisites
-
You are running Windows 7 or later version. This was tested on Windows 10.
-
You have to create a valid credential for accessing https://console.VirtEngine.com. How to create an account with VirtEngine.
-
You have to create an atharva storage account with VirtEngine. How to create an atharva account with VirtEngine.
Connecting S3 Browser with Atharva (Ceph object storage) VirtEngine
This initial section contains everything you need to setup S3 Browser windows native client on your server.
Step-1 Download S3 Browser for windows
-
Go to this link. S3 browser.
-
Click
Download S3 Browserin www.s3browser.com to start your download. -
Right-click the download file and install it in your windows system.
Step-2 Create the storage setting with VirtEngine
-
Open the S3 Browser.
-
Click the
Accounts -> Create New Accountbutton in S3 browser. it will open the pop-up window. -
Choose
S3 Compatible Storageas a storage type and specify REST endpoint as88.198.139.81. -
Enter the other details.
Account Name : Type a name for the accountAccess key Secret key
You can see your Access-key and Secret-key from your profile page in VirtEngine(https://console.VirtEngine.com)
- Click the Add new account button the account is created and it display the bucket already created in VirtEngine.
Step-3 Create new bucket
-
Click the
Bucket -> Create New Bucketbutton it will open the pop-up window. -
Ask for the bucket name, you can assign your bucket name.
-
Click the
Create new bucketbutton the bucket it created.
Upload a file from S3 Browser to VirtEngine
-
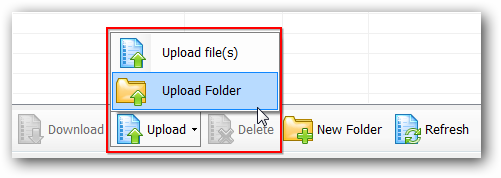
Click the Upload button.
-
Choose the one or multiple files to upload/choose an upload folder if you want to upload a whole folder or whole drive.
-
Select the files you want to upload or select the folder to upload. The upload process will begin. You can track the progress on the Tasks tab.
-
Let us verify if the files is uploaded
Logon https://console.VirtEngine.com goto storage place. You can see your bucket, and the uploaded files are displayed.
Conclusion
These are the very simple steps to create bucket and upload files using Windows native client using S3 Browser to Atharva - VirtEngine.
This is a good head-start for using S3 Browser & our Athava ceph based object storage in VirtEngine.