How to deploy Private Docker Registry in VirtEngine
Introduction
A Docker registry serves to manage Docker images in your organization, whether created internally or downloaded from remote Docker resources such as Docker Hub.
The Registry is a stateless, highly scalable server side application that stores and lets you distribute Docker images.
Why use it
You should use the Registry if you want to:
- tightly control where your images are being stored
- fully own your images distribution pipeline
- integrate image storage and distribution tightly into your in-house development workflow
This tutorial will guide you in setting up a Private docker registry in VirtEngine.
Prerequisites
-
You are running Ubuntu 14.04 or Linux workstation.
-
Git installed on your server, which you can do by following the How To Install Git with Apt.
-
An account on GitHub, which is a Git repository host.
-
You have to create a valid credential for accessing https://console.VirtEngine.com.How to create an account with VirtEngine.
Introducing Atharva Storage - VirtEngine
Atharva Storage - VirtEngine is a “Cloud object storage, low latency and (S3 - AWS Signature v2) compatible API built on top of ceph - jewel.”.
Upon successful signin to https://console.VirtEngine.com, look for the icon
at the top right hand corner named Storage

To Deploy Private Docker Registry
This initial section contains everything you need to set private registry on your server.
Step-1 Creating Ubuntu VM
-
First, ensure you can login to https://console.VirtEngine.com.
-
Go to the Market Places.
-
select the Ubuntu, A window will pop up with for CPU, storage, RAM and SSHkey options.
-
You can choose the storage size, RAM capacity.
-
You can Create a new sshkey, use an existing sshkey or import your own sshkeys too.
-
Click the Create button. it will create the virtual machine.
Step-2 Creating a Bucket in our Storage
-
Go to the Storage.
-
Click the create storage button. it will open one pop-up window. You can create a bucket.
-
Let us provide our bucket name as
docker-registry.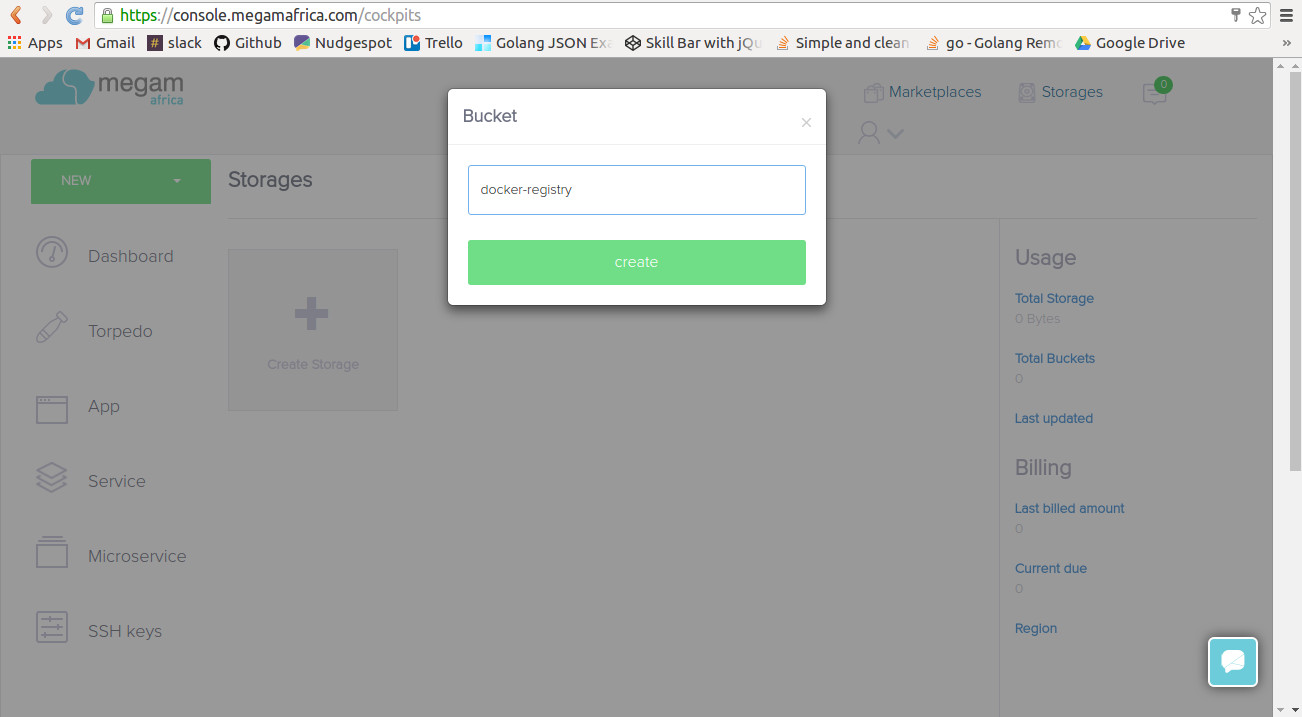
Step-3 Installing Docker
-
You need to access the launched Virtual Machine from
step-1via a terminal. -
You can download the SSH Keys from SSH Keys tab or Overview page. Use this key to login to your virtual machine using the following command,
ssh -i path to/<private_key filename> root@<ipaddress> -
Update your apt sources
echo 'deb https://apt.dockerproject.org/repo ubuntu-trusty main' >/etc/apt/sources.list.d/docker.list sudo apt-get install apt-transport-https ca-certificates sudo apt-key adv --keyserver hkp://p80.pool.sks-keyservers.net:80 --recv-keys 58118E89F3A912897C070ADBF76221572C52609D sudo apt-get install linux-image-generic-lts-trusty -
Update your APT package index.
sudo apt-get update -
Install Docker.
sudo apt-get install docker-engine -
Start the docker daemon.
sudo service docker start
Step-4 Run the Docker Registry
- Inside the virtual machine, Use the following command to run the docker registry.
Add an extra STORAGE_PATH=/registry to create a child folder under docker-registry bucket. Apparently this didn’t work for us.
	docker run \
     -e SETTINGS_FLAVOR=ceph-s3 \
     -e AWS_BUCKET=docker-registry \
     -e STORAGE_PATH=/registry \
     -e AWS_REGION=default \
     -e AWS_KEY=<access-key> \
     -e AWS_SECRET=<secret-key> \
     -e AWS_CALLING_FORMAT=boto.s3.connection.OrdinaryCallingFormat \
     -e AWS_PORT=80 \
     -e AWS_HOST=88.198.139.81 \
     -p 5000:5000 \
     registry

     /* enter your bucket-name here.that you are created in step-2.
    You can see your Access-key and Secret-key from your profile page in VirtEngine(https://console.VirtEngine.com) */
- Create a docker images by running the following command
Enter this command in your virtual machine
sudo docker pull <imagename>
eg: sudo docker pull hello-world 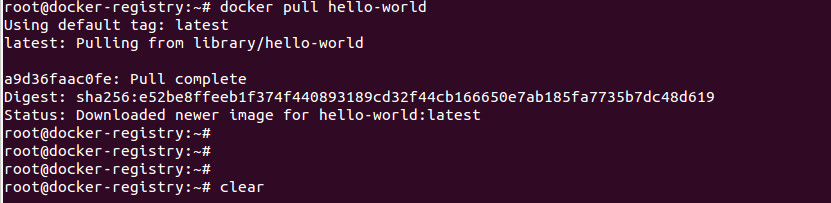
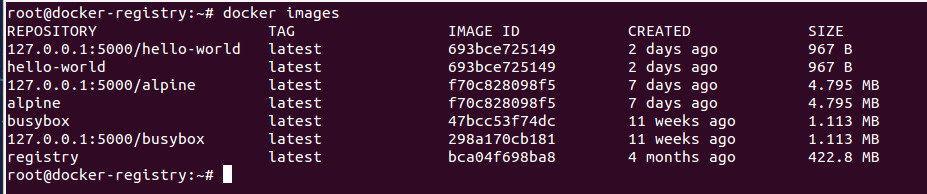
-
Check if the image is downloaded in the VM
docker images
- Push downloaded docker image to your private registry.
As you are inside the VM, the private registry is running under 127.0.0.1:5000
sudo docker tag hello-world 127.0.0.1:5000/hello-world
sudo docker push 127.0.0.1:5000/hello-world

- Let us verify if the image is stored
Logon https://console.VirtEngine.com goto storage place. You can see the docker images in file structure order.

-
Grab the private regitry’s ipaddress
ifconfig
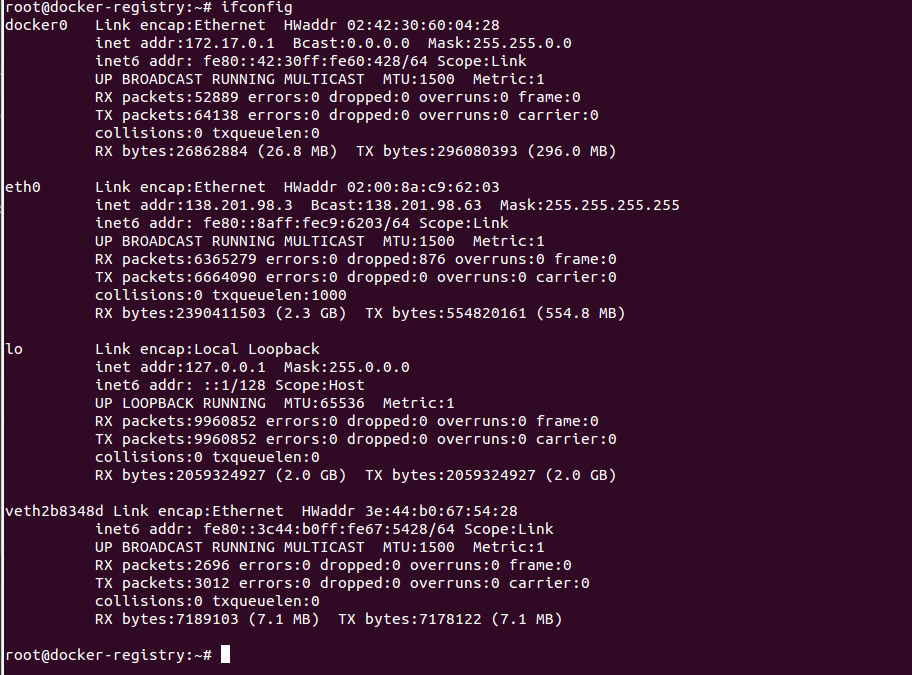
In our case the docker registry is running at 138.201.98.3.
Step-5 Pull a docker images
-
Goto your workstation, Open the /etc/default/docker file
-
Edit or add the DOCKER_OPTS line and add the
--insecure-registry flag.DOCKER_OPTS="--insecure-registry <vm-ipaddress>:5000" -
Close and save the configuration file.
-
Restart your Docker daemon
service docker stop service docker start -
To run the pull command, make sure docker is running
docker pull 138.201.98.3:5000/hello-world

Conclusion
These are the very simple steps to create vm, utilize our atharva storage.
This is a good head-start for deploy a private docker-registry in VirtEngine.